
Learning deadlift form gives you the ability to make progress at a startling rate and accelerate past almost everyone else at your gym!
Along with the squat, the deadlift is known as the “King of Exercises” and the many
benefits of deadlifting
are testament to this. Getting good at deadlifting is a very effective use of your time if you want rapid results!
People tend to shy away from this exercise because they don’t know how to perform it correctly; this is understandable as the only thing worse than not doing an effective exercise is doing it badly.
I used to be the same and did lat pulldowns and cable rows instead, but I honestly saw my best progress once I started deadlifting regularly and I wished I’d started earlier.
I needed someone to show me good deadlift form so I could workout safely and confidently. You probably do too and that’s where I come in.
I’ll teach you everything you need to know about proper deadlift form and before you know it you’ll be pulling houses from the floor while getting leaner and stronger than ever before!
What is a Deadlift?
A deadlift is a simple exercise where you lift a dead weight (hence the name), in this case a barbell from the floor in a bent over position. The bar is lifted up the legs, past the knees and then the hips and shoulders are “locked out” or straightened.
The deadlift is easy to do wrong, the only time I see anyone deadlifting it’s usually because Flex magazine told them to but they didn’t really learn HOW to deadlift. I’ve seen some horrible form with rounded backs and all manner of dangerous practices which actually make it a less effective exercise and highly increases the risk of injury.
The deadlift can appear to be overly complex as there is a lot to get right, but we can break it down into manageable chunks of information. I’ll also give you a handful of markers to remember so you know you’re deadlifting safely.
Learning Proper Deadlift Form
Good deadlift form needs to be broken down into each part of the movement to ensure you understand the mechanics of the lift and avoid common deadlifting problems.
I’m sure it’s obvious but its worth mentioning again that a proper
gym warm up
is imperative, don’t make the mistake of cutting this out. Warming up IMPROVES your deadlift performance.
Let’s work through each area one-by-one starting from the very beginning:
Preparing To Deadlift
Foot Stance
Foot Width
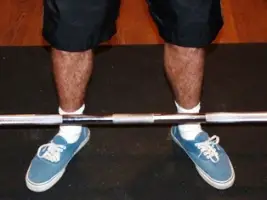
Your feet should be 12-15 inches apart which is usually just wider than shoulder width and your toes should be pointing outwards slightly
Bar Position
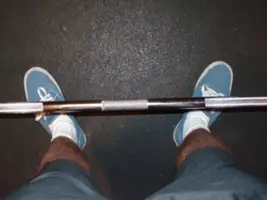
The bar should be over the middle of your foot (not just the bit you can see, your entire foot), this will usually mean the bar is 2-3 inches from your shins.
Gripping The Bar
How To Grip – There are two ways to grip the bar during deadlifts, the first is known as a double overhand grip and the second is called an alternate grip. An overhand grip should be used during all warm up sets; once you’re warmed up you should use the alternate grip.
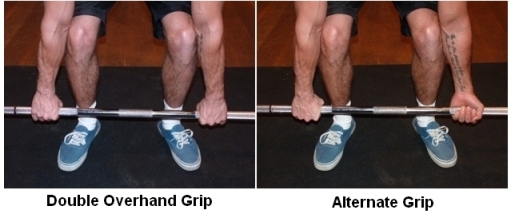
Sidebar – Why Different Grips?The alternate grip is used for your first real sets (known as work sets) because it makes the weight actually feel lighter which means your grip strength doesn’t give up before your back muscles do! It also helps to develop your grip strength and you’ll be able to handle heavier weights in no time at all. Try it for yourself. A weight that you can’t lift with a double overhand grip will go up much easier with an alternate grip, this is because your brain tells your back the weight is too heavy to handle and therefore you can’t move it. Because the alternate grip allows you to handle more weight, your brain switches off this signal and up the bar goes! |
Grip Width
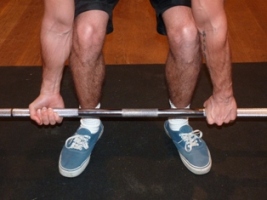
You should grip the bar just wider than your legs, so your hands will be an inch or so from your legs.
Hand Position
The bar should rest at the end of your palm near your fingers. Any higher and gravity will force the bar lower causing excessive calluses.
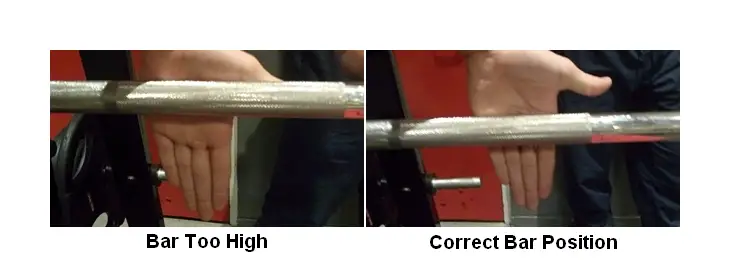
Straight Arms
Your arms should be perfectly straight, bent elbows are an injury risk and they actually add nothing to helping you lift the weight.
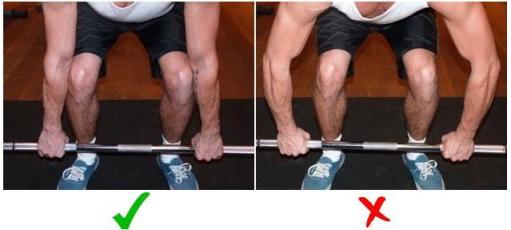
The Starting Position
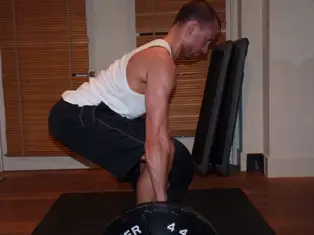
Shins touching the bar – Lower your hips by bending your knees, your knees will move forwards over the bar and your shins will touch it
Lift Chest/Shoulders Back – Lift your chest up and pull your shoulders back, this will ensure your back is straight. Maintain this position throughout the movement
Look Forward – Your neck should be straight in line with your spine. Looking up can cause an injury and looking down can cause your back to round, focus on an area on the floor 10 feet in front of you.
Shoulders Blades Over Bar – Your shoulder blades should be directly over the bar with your actual shoulders in front of the bar
Performing The Deadlift
Find Your Heels – I always find it useful to curl my toes up or rock back slightly to remind myself that the deadlift starts by PUSHING through your heels using your quads. This will help you avoid pulling the weight up with your back which is not good deadlift form!
Deep Breath & Tighten Core – Take a deep breath and tense your abs, lower back and chest. This increases intra-abdominal pressure which stabilises your spine and keeps your body tight, making your stronger
Quads First – Your quads should be used to get the bar moving, not your lower back, drive through your heels and use your quads to extend your legs
Bar Close To Body – The bar stays close to your shins throughout the lower half of the movement and then close to your thighs on the upper part. This is important to ensure you are following the correct path for the movement.
Squeeze Your Ass! – After your quads have got the bar moving, your hamstrings and glutes take over once you’re thighs are almost vertical.
The Middle
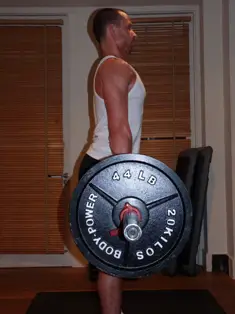
Chest Up/Shoulders Back – At the top you should push your chest up and your shoulders back
Eyes Forward/Knee’s and Hips Extended – Your eyes should be directly forwards and your knees and hips straight
Don’t Overextend! – Leaning back at the top is dangerous as you hyperextend your lumbar spine and it adds nothing to the effectiveness of the lift itself.
Bringing The Bar Down
Descent Speed – Too slow and it tires you out, too fast and it’s bad for your knees and shins. Use a sensible speed to return the bar to the floor
Maintain Proper Deadlift Form – The downwards movement is an exact reverse of the upwards. Maintain the same good deadlift form and set the bar down
Breathe at The Bottom – Allow the bar to rest, loosen up your form (keep the bar in your hands), take a few breaths. Get back in the starting position, tighten your core and lift the next rep
Don’t Bounce Between Reps – People bounce between reps because the kinetic energy makes it easier and helps them lift the bar. It defeats the object of the exercise as the benefits come from lifting the bar from a DEAD stop.
Handy Checklist For Good Deadlift Form
Preparing
- Feet 12-15 inches apart, toes pointed out slightly
- Bar over middle foot, 2-3 inches from shins
- Alternate grip on work sets, grip just outside of legs
- Bar in “foot” of palm near to fingers
- Arms Straight
Starting Position
- Shins touching the bar
- Lift chest/shoulders back
- Look forward
- Shoulder blades over bar
Performing The Deadlift
- Find your heels
- Deep breath and tighten core
- Quads first
- Bar close to body
- Squeeze glutes nearer top
The Middle
- Chest Up/Shoulders back
- Eyes forward/knee’s and hips extended
- Don’t hyperextend!
Bringing The Bar Down
- Sensible descent speed
- Maintain good deadlift form
- Breath at bottom
- Don’t bounce between reps
The number of markers above might make you want to forgo the deadlift in favour of a less effective exercise but you would be short changing yourself so don’t make that mistake!
Follow the guidelines above and make sure you look out for these markers which will ensure you follow proper deadlift form so you can get strong safely!
If you want to be sure you’re doing deadlifts using the correct deadlift form then you may also find it useful to know what NOT to do, so you can access your own form.
These Deadlift Tips help you see common deadlift mistakes so you can make sure you’re avoiding them!
Print off the markers and take them to the gym with you, start light and work on perfecting your form. The results you acquire once you start deadlifting with proper form will pay you back a million times over!
Return from Deadlift Form to Weightlifting Exercises
Return to Back Exercises
Return to the Homepage